Imagine this: You install a new program, update a driver, or tweak a system setting, and suddenly your Windows 10 PC starts behaving erratically – it crashes, slows down, or an application stops working. This is a common scenario for many computer users. While regular backups of your personal files are crucial, they don’t help if the operating system itself becomes unstable. This is where System Restore Points come in.
A System Restore Point is essentially a snapshot of your Windows system files, installed applications, Windows Registry, and system settings at a specific moment in time. Think of it as a rewind button for your computer’s software configuration. If an issue arises after a change, you can “restore” your system to an earlier state where everything was working correctly, without affecting your personal documents, pictures, or other data.
The concept of system restoration has been a part of the Windows operating system since Windows ME, providing users with a safety net for software-related problems. In Windows 10, while it creates automatic restore points during significant system changes (like major Windows updates or some software installations), manually creating one before making risky changes is a proactive and highly recommended practice.
Why Create a Restore Point?
Creating a restore point acts as a safeguard. It’s particularly useful before:
- Installing new software or drivers that you’re unsure about.
- Making significant changes to system settings or the Windows Registry.
- Running system optimization tools or uninstalling multiple programs.
- Performing complex troubleshooting steps.
It’s your insurance policy against unforeseen software conflicts or corruption.
Step-by-Step Guide: Creating a Restore Point in Windows 10
The process to create a System Restore Point in Windows 10 is straightforward, primarily utilizing the System Properties window.
Step 1: Access System Protection
The first step is to open the System Protection tab within the System Properties window.
- Open the Search Bar: Click on the Start button or the search icon (magnifying glass) on your taskbar.
- Search for “Create a restore point”: Type create a restore point into the search bar.
- Open System Properties: From the search results, click on the option that says “Create a restore point”. This will directly open the System Properties window to the System Protection tab.
Alternatively, you can access it via Control Panel:
- Open Control Panel: Type control panel in the Windows search bar and click on the result.
- Change View (if necessary): If “View by” is set to “Category,” click on System and Security, then System. If “View by” is “Large icons” or “Small icons,” simply click on System.
- Click System protection: On the left-hand side of the System window, click System protection.
Step 2: Configure System Protection for Your Drive (If Not Already Enabled)
For System Restore to work, it must be enabled for your primary system drive (usually C:). If it’s not enabled, the “Create…” button will be grayed out.
- Check Protection Status: In the System Protection tab, under “Protection Settings,” check the “Protection” status for your Local Disk (C:) (System).
- Enable System Protection: If the status is “Off,” select the C: drive and click the Configure… button.
- Turn on System Protection: In the new window, select Turn on system protection.
- Set Disk Space Usage: Drag the slider under “Max Usage” to allocate enough disk space for restore points. A general recommendation is between 3-5% of your drive’s total capacity. This space will be used to store restore points; older points will be deleted automatically to make room for new ones once the limit is reached.
- Apply and OK: Click Apply, then OK.
Step 3: Create the Restore Point
Now that System Protection is enabled for your system drive, you can create a manual restore point.
- Click “Create…”: Back in the System Protection tab, with Local Disk (C:) (System) selected, click the Create… button.
- Enter a Description: A new small window will appear, prompting you to “Type a description that will help you identify the restore point.” Choose a descriptive name, such as:
- Before installing [Software Name]
- Pre-driver update [Date]
- System OK [Date]
- For example, Before Game Install 2025-06-27.
- Click “Create”: Click the Create button.
- Wait for Completion: Windows will now create the restore point. This process can take a few minutes, depending on your system’s speed and the amount of data to be captured. A progress bar will be displayed.
- Confirmation: Once finished, a message will appear stating, “The restore point was created successfully.” Click Close.
You have now successfully created a System Restore Point!
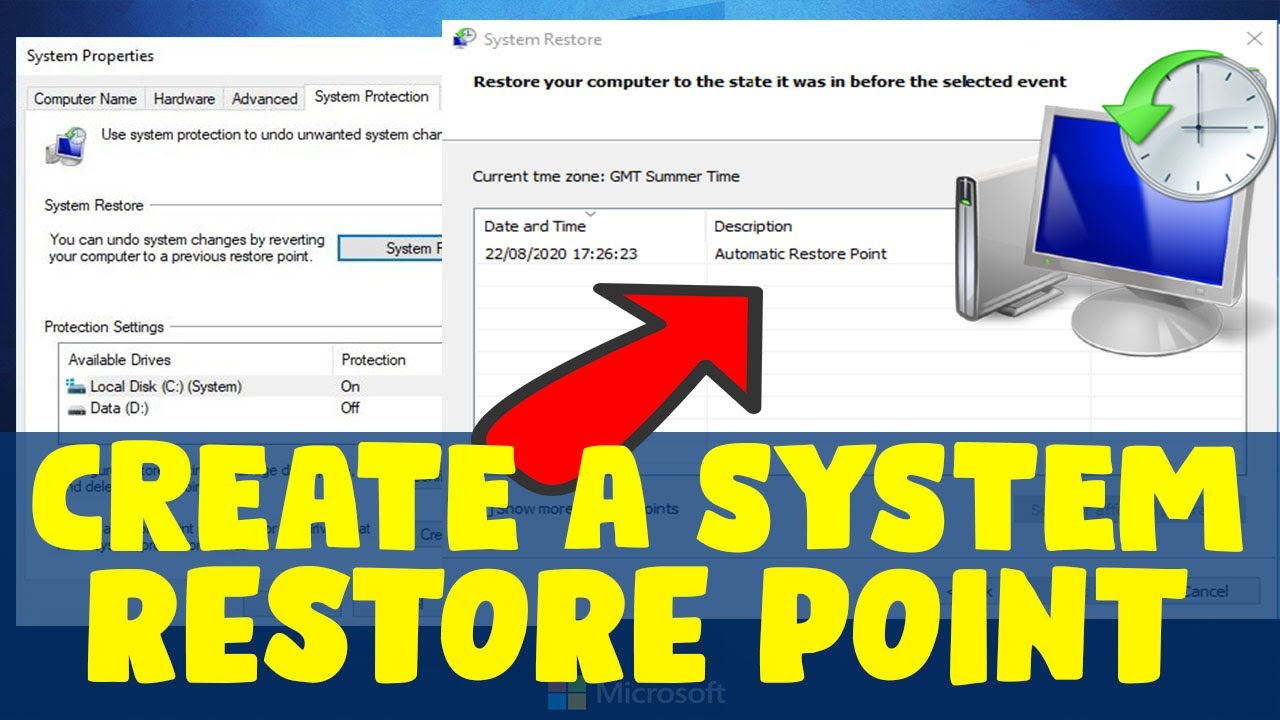
How to Use a Restore Point (System Restore)
If you ever need to revert your system using a restore point:
- Open System Properties: Follow Step 1 from the creation process (search for “create a restore point”).
- Click “System Restore…”: In the System Protection tab, click the System Restore… button.
- Follow the Wizard: The System Restore wizard will launch.
- Click Next.
- You’ll see a list of available restore points. Select the one you want to use. You can click “Scan for affected programs” to see what programs will be removed or restored during the process.
- Click Next.
- Confirm your choice and click Finish.
- Restart and Restore: Your computer will restart and begin the restoration process. Do not interrupt this process. Once complete, your system will revert to the state it was in when the chosen restore point was created.
Key Considerations and Best Practices
- Not a Backup Replacement: System Restore is not a replacement for a full file backup. It only affects system files, installed programs, and registry settings. Your personal documents, photos, videos, and other user data will remain untouched. Always back up your important personal files regularly to an external drive or cloud service.
- Disk Space Management: Monitor the disk space allocated for System Restore. If you allocate too little, older restore points will be automatically deleted sooner. If you have plenty of space, you can keep more restore points.
- Automatic Restore Points: Windows 10 automatically creates restore points before major updates, driver installations, and some software installations. However, these aren’t guaranteed, which is why manual creation is important.
- Troubleshooting Tool: Think of System Restore as a quick troubleshooting tool for software issues, not a comprehensive disaster recovery solution.
- Disable and Re-enable if Issues: Sometimes, if System Restore isn’t working correctly, disabling it, restarting your PC, and then re-enabling it can resolve underlying issues.
FAQ Section
Q1: What exactly does a System Restore Point save?
A System Restore Point saves a snapshot of your Windows system files, installed applications, the Windows Registry, and critical system settings. It does not save your personal files such as documents, photos, music, or videos.
Q2: Will using a restore point delete my personal files?
No, using a System Restore Point will not delete your personal files. It only affects system-level changes, installed programs, and drivers that were changed after the restore point was created. Any documents, pictures, or videos you created or saved will remain untouched.
Q3: How much disk space should I allocate for System Restore Points?
For most users, allocating 3-5% of your primary drive’s total capacity for System Restore Points is usually sufficient. This allows for a reasonable number of restore points to be saved. If you have a smaller drive or limited space, you might need to adjust this down, but be aware that older restore points will be deleted more quickly.
Q4: My “Create…” button is grayed out. What should I do?
If the “Create…” button is grayed out, it means System Protection is not enabled for your primary system drive (usually C:). You need to first select your C: drive in the System Protection tab, click the Configure… button, and then select “Turn on system protection” and set the disk space usage.
Q5: How often does Windows 10 create automatic restore points?
Windows 10 automatically creates restore points under certain conditions, such as before significant system updates (like feature updates), when some applications are installed, or when certain drivers are updated. However, these automatic points are not scheduled daily or weekly. For critical tasks, manually creating a restore point is always recommended.