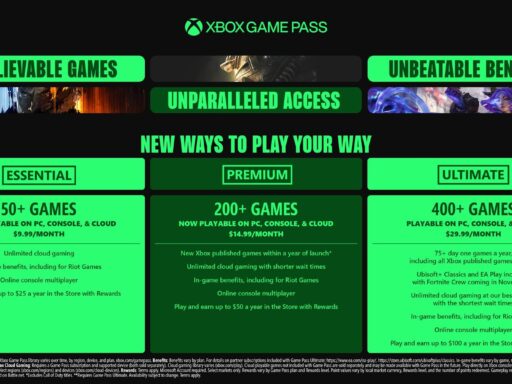
Category: News

  • How to Open Multiple Desktops in Windows 11

    How to Open Multiple Desktops in Windows 11

    Are you juggling numerous applications, browser tabs, and documents, leading to a cluttered and overwhelming screen? If your single desktop feels like a chaotic mess, then Windows 11’s multiple desktops feature is your productivity superpower. Also known as “Virtual Desktops” or “Task View,” this feature allows you to create separate, organized workspaces for different tasks or projects. Imagine having one desktop for work, another for personal Browse, and a third for creative projects, each with its own set of open applications.

    I’ve found this feature indispensable for managing my workflow, especially when working on complex projects that require many open windows. It keeps my digital space clean and helps me focus without distractions. This guide will show you how to open multiple desktops in Windows 11, manage them efficiently, and boost your multitasking abilities.

    What are Multiple Desktops in Windows 11?

    Multiple desktops (or virtual desktops) in Windows 11 provide distinct, isolated workspaces. Each desktop can host different applications and windows, allowing you to logically group your tasks. For example, you can have:

    • Desktop 1: Work-related applications (email, project management software, spreadsheets).
    • Desktop 2: Personal Browse and social media.
    • Desktop 3: Creative tools (photo editing, video editing software).

    Switching between these desktops is quick and seamless, making it feel like you have several monitors even if you only have one physical screen.

    Method 1: Using the Task View Button

    The Task View button is the primary gateway to managing multiple desktops.

    Step 1: Locate the Task View Button

    The Task View button is an icon on your taskbar that looks like two overlapping rectangles. It’s usually located near the Start button.

    • If you don’t see it, right-click on an empty space on your taskbar, select “Taskbar settings,” and then toggle “Task view” to On.

    Step 2: Open Task View

    Click the Task View button on your taskbar.

    • This will open a full-screen interface showing all your open windows from the current desktop at the top, and a row of your existing desktops at the bottom. Your current desktop will be highlighted.

    Step 3: Create a New Desktop

    At the bottom right of the Task View interface, you’ll see a “+ New desktop” button (or a plus icon).

    • Click this button to instantly create a new, empty desktop. A new thumbnail for “Desktop 2” (or the next sequential number) will appear.

    Step 4: Switch to a New Desktop

    Click on the thumbnail of the new desktop you just created to switch to it.

    • Your screen will now be completely clear, providing a fresh workspace. You can open applications here, and they will only appear on this specific desktop.

    Method 2: Using Keyboard Shortcuts (The Fastest Way)

    Keyboard shortcuts are often the quickest and most efficient way to manage multiple desktops once you get used to them.

    Step 1: Open Task View with a Shortcut

    Press Windows key + Tab to open the Task View interface.

    Step 2: Create a New Desktop with a Shortcut

    Press Windows key + Ctrl + D.

    • This instantly creates a new desktop and automatically switches you to it. You don’t even need to open the Task View interface first. This is my go-to method for quick desktop creation.

    Step 3: Switch Between Desktops with Shortcuts

    To navigate between your existing desktops:

    • Press Windows key + Ctrl + Left arrow to move to the desktop on the left.
    • Press Windows key + Ctrl + Right arrow to move to the desktop on the right.

    Managing Your Multiple Desktops

    Once you have several desktops open, you’ll want to manage them effectively.

    1. Rearrange Desktops:

    In the Task View interface (Windows key + Tab), you can drag and drop desktop thumbnails to change their order. This helps if you want to keep related desktops next to each other.

    1. Rename Desktops:

    Windows 11 allows you to name your desktops, making them much easier to identify and manage.

    • Open Task View (Windows key + Tab).
    • Click on the name “Desktop 1,” “Desktop 2,” etc., beneath the thumbnail of the desktop you want to rename.
    • Type a new, descriptive name (e.g., “Work,” “Personal,” “Gaming,” “Project X”).
    • Press Enter.
    1. Move Windows Between Desktops:

    You can easily transfer open applications from one desktop to another.

    • Open Task View (Windows key + Tab).
    • Hover your mouse over the desktop that contains the window you want to move. This will show its open applications.
    • Drag and drop the desired window’s thumbnail from its current desktop to the thumbnail of the target desktop.
    • Alternatively, right-click on a window’s thumbnail in Task View, select “Move to,” and then choose the target desktop (e.g., “Desktop 1,” “New desktop”).
    1. Close a Desktop:

    When you’re finished with a particular task, you can close its dedicated desktop.

    • Open Task View (Windows key + Tab).
    • Hover over the desktop you want to close.
    • Click the “X” icon that appears in the top-right corner of the desktop thumbnail.
    • Important: If there are open windows on the desktop you’re closing, they will automatically be moved to the adjacent desktop (usually the one to its left, or the next available desktop). No data will be lost.
    1. Close Task View:

    Press Esc or click anywhere outside the Task View interface to return to your current desktop.

    Advanced Tips for Multiple Desktop Usage

    • Custom Backgrounds for Each Desktop: This is a fantastic way to visually distinguish your workspaces.
      • Open Task View (Windows key + Tab).
      • Right-click on the desktop thumbnail you want to customize.
      • Select “Choose background.”
      • This will take you to Personalization > Background settings, where you can select a different image for that specific desktop.
    • Snap Layouts with Multiple Desktops: Combine the power of snap layouts within each virtual desktop. You can arrange multiple windows efficiently on one desktop and still have dedicated desktops for other tasks.
    • Drag and Drop from Taskbar: You can even drag an application’s icon from the taskbar directly onto a desktop thumbnail in Task View to open it on that specific desktop.

    Troubleshooting and Common Questions

    • “My apps are showing on all desktops!”: This can happen if you set an application to show on all desktops.
      • Open Task View (Windows key + Tab).
      • Right-click the application window you want to manage.
      • Ensure “Show this window on all desktops” is unchecked.
      • If you want a specific app (like your email client) to be visible regardless of which desktop you’re on, then check “Show this window on all desktops” or “Show windows from this app on all desktops.”
    • My Task View button is missing: As mentioned, right-click the taskbar, go to “Taskbar settings,” and ensure “Task view” is toggled on.
    • What if I accidentally close a desktop? Don’t worry! Any applications open on that desktop will automatically move to the next available desktop. You won’t lose your work.
    • Can I save my desktop layouts? Windows 11 doesn’t have a built-in feature to save and load specific desktop layouts or groups of applications. They persist across reboots, but for truly custom saving, you might need third-party tools.

    By effectively utilizing multiple desktops in Windows 11, you can transform your multitasking game, reduce visual clutter, and improve your focus and productivity. It’s a simple yet powerful feature that, once mastered, becomes an essential part of an organized digital workspace. Give it a try, and see how much more efficient your daily computing can become!

  • How to disable Windows 10 tracking features

    How to disable Windows 10 tracking features

    Windows 10 includes several data collection and telemetry features that send diagnostic and usage data back to Microsoft. While some tracking is essential for maintaining system health and security, many users—including myself—prefer to reduce or disable these features to enhance privacy and control over personal data. In this guide, I’ll show you how to disable Windows 10 tracking features step by step. All the steps use built-in tools and settings available in the operating system. Whether you’re a casual user or a privacy-conscious power user, this guide will help you take control of your digital footprint in Windows 10.

    What Tracking Features Exist in Windows 10?

    Before we disable anything, it’s important to understand what tracking features Windows 10 uses:

    • Activity history tracking
    • Advertising ID for personalized ads
    • Location tracking
    • Cortana data collection
    • Diagnostic and feedback telemetry
    • App usage and handwriting data
    • Voice typing and speech recognition
    • Cloud clipboard syncing

    All of these can be disabled or limited, depending on your needs.

    Step 1: Disable Activity History Tracking

    This feature tracks the apps and services you use and stores the activity in the cloud if you’re signed in with a Microsoft account.

    Steps:

    1. Press Windows + I to open Settings.
    2. Go to Privacy > Activity history.
    3. Uncheck “Store my activity history on this device”.
    4. Uncheck “Send my activity history to Microsoft”.
    5. Scroll down and click Clear activity history to remove existing records.

    Tip: Disabling this helps prevent your timeline data from being stored and synced across devices.

    Step 2: Turn Off Advertising ID and Ad Tracking

    Microsoft assigns each user an Advertising ID to deliver personalized ads across apps and websites.

    Steps:

    1. Open Settings > Privacy > General.
    2. Toggle off “Let apps use advertising ID to make ads more interesting to you”.
    3. Toggle off other options like:
      • Let websites provide locally relevant content”
      • “Let Windows improve Start and search results”
      • “Show me suggested content in Settings

    This helps limit targeted advertising and telemetry.

    Step 3: Disable Location Tracking

    Windows uses location services for apps like Maps and Weather, but you can turn this off system-wide.

    Steps:

    1. Go to Settings > Privacy > Location.
    2. Click Change under “Allow access to location on this device” and toggle it off.
    3. Toggle off Location service.
    4. Scroll down to Clear location history on this device and click Clear.
    5. Under Choose which apps can access your precise location, disable each one individually.

    From personal experience, disabling location tracking also improves battery life on laptops.

    Step 4: Limit Diagnostic and Feedback Data

    This feature controls how much diagnostic data Windows sends to Microsoft.

    Steps:

    1. Open Settings > Privacy > Diagnostics & feedback.
    2. Set the Diagnostic data level to Required only or Basic (in older builds).
    3. Scroll down and toggle off:
      • “Tailored experiences”
      • “Improve inking and typing”
      • “Send optional diagnostic data”
    4. Click Delete diagnostic data to remove what’s already collected.

    Note: Some data collection can’t be turned off completely unless you’re using Windows 10 Enterprise or Education editions.

    Step 5: Disable Cortana and Search Data Collection

    Cortana is the digital assistant in Windows. Even if you’re not using it, it may collect data.

    Steps:

    1. In the search bar, type Cortana settings and open it.
    2. Toggle off Cortana can give you suggestions, ideas, reminders, alerts.
    3. Go to Settings > Privacy > Speech, inking, & typing.
    4. Click Turn off speech services and typing suggestions.

    This stops cloud-based speech recognition and personal typing data collection.

    Step 6: Disable Background App Tracking

    Many apps continue running in the background and may collect usage data.

    Steps:

    1. Go to Settings > Privacy > Background apps.
    2. Toggle off Let apps run in the background.
    3. Or selectively turn off individual apps.

    This not only enhances privacy but also improves performance and battery life.

    Step 7: Stop Syncing of Clipboard Data

    Windows 10 allows you to sync clipboard contents across devices, which involves cloud storage.

    Steps:

    1. Go to Settings > System > Clipboard.
    2. Toggle off Clipboard history.
    3. Toggle off Sync across devices.

    Personally, I found this feature useful but unnecessary on a single-PC setup, so disabling it made sense.

    Step 8: Disable Timeline and App Launch Tracking

    Windows can remember the apps you open frequently and use that data to make suggestions.

    Steps:

    1. Open Settings > Privacy > General.
    2. Disable the option Let Windows track app launches to improve Start and search results.

    This ensures that app usage habits aren’t stored or analyzed locally.

    Step 9: Use Local Account Instead of Microsoft Account (Optional)

    A Microsoft account syncs settings, passwords, and data across devices—but also increases tracking potential.

    To switch to a local account:

    1. Go to Settings > Accounts > Your info.
    2. Click Sign in with a local account instead.
    3. Follow the on-screen instructions.

    This limits the amount of personal data shared with Microsoft.

    Step 10: Disable Syncing of Settings

    Windows syncs your themes, language preferences, passwords, and more across devices.

    Steps:

    1. Go to Settings > Accounts > Sync your settings.
    2. Toggle off Sync settings.
    3. Optionally, disable individual sync items like passwords, language preferences, etc.

    If you prefer privacy over convenience, disabling this is a good step.

    Final Cleanup: Block Tracking Using Hosts File or Third-Party Tools (Advanced)

    For advanced users, you can block telemetry servers using the hosts file or tools like O&O ShutUp10.

    Caution:

    Only do this if you’re comfortable editing system files or using trusted third-party tools. Incorrect settings may cause update or connectivity issues.

    Final Thoughts

    Disabling tracking features in Windows 10 takes some time and attention, but it’s worth the effort if you value your privacy and want better control over your personal data. I’ve followed these exact steps on multiple systems over the years, and they’ve helped reduce unnecessary data collection without compromising the system’s core functionality.

    While Microsoft uses telemetry to improve user experience and security, it’s your choice how much data you’re comfortable sharing. With the steps above, you now have the knowledge and tools to adjust those settings to your preference.

  • How to Tweak Performance Settings Using Group Policy Editor

    How to Tweak Performance Settings Using Group Policy Editor

    The Group Policy Editor in Windows is a powerful tool that lets you manage advanced system settings without needing third-party utilities or registry hacks. While it’s commonly used for security and administrative control, it can also be configured to improve performance on Windows 10 and Windows 11 systems. I’ve personally used Group Policy tweaks across several Windows setups—especially on older laptops and professional workstations—to reduce resource consumption, streamline background services, and increase overall responsiveness. In this guide, I’ll show you how to safely tweak key performance settings using Group Policy Editor, step by step.

    What Is Group Policy Editor?

    Group Policy Editor (gpedit.msc) is a built-in Windows management console that allows users—especially administrators—to configure system behavior and enforce policies. It is available in Windows Pro, Enterprise, and Education editions.

    Note: Group Policy is not available in Home editions unless manually enabled (not officially supported).

    Why Use Group Policy to Improve Performance?

    Modifying performance settings via Group Policy:

    • Requires no third-party tools
    • Applies at the system level, not just per user
    • Is safer than registry editing (with rollback capability)
    • Offers persistent configuration across restarts and updates

    You can reduce background processes, disable unnecessary animations, and prioritize active applications to get better performance on older hardware or under heavy workloads.

    Before You Begin

    • You must be signed in as an Administrator
    • Consider creating a System Restore Point before making changes
    • After changes, use gpupdate /force to apply policies immediately

    Step-by-Step: Tweak Performance Settings via Group Policy

    1. Open Group Policy Editor
    • Press Windows + R, type gpedit.msc, and hit Enter
    • The Local Group Policy Editor will open
    1. Optimize Visual Effects

    Disabling visual effects can reduce GPU and CPU usage, especially on systems with low RAM or integrated graphics.

    Path:
    Computer Configuration > Administrative Templates > System > Performance Control

    Steps:

    1. Double-click Turn off Windows visual effects
    2. Set to Enabled
    3. Select specific effects to disable (e.g., menu fade, taskbar animations), or choose to turn off all visual effects
    4. Click Apply, then OK

    This setting removes unnecessary animations that can slow down UI responsiveness.

    1. Disable Background Apps

    Preventing background apps from running helps conserve memory and CPU cycles.

    Path:
    Computer Configuration > Administrative Templates > Windows Components > App Privacy

    Steps:

    1. Double-click Let Windows apps run in the background
    2. Set to Enabled
    3. Choose Force Deny from the drop-down
    4. Apply changes

    This stops Universal Windows Platform (UWP) apps from running silently in the background.

    1. Prioritize Foreground Applications

    You can prioritize CPU resources for applications you are actively using.

    Path:
    Computer Configuration > Administrative Templates > System > Processor Scheduling

    Steps:

    1. Double-click Optimize processor scheduling for foreground applications
    2. Set to Enabled
    3. Apply and reboot if needed

    This ensures active windows and apps get priority over background services.

    1. Turn Off Windows Tips and Consumer Features

    Tips and consumer features consume system resources and bandwidth unnecessarily.

    Path:
    Computer Configuration > Administrative Templates > Windows Components > Cloud Content

    Steps:

    1. Double-click Do not show Windows tips
    2. Set to Enabled

    Then go to:
    Computer Configuration > Administrative Templates > Windows Components > Content Delivery Manager

    • Enable: Turn off Microsoft consumer experiences

    These settings disable pop-ups and downloads related to promotional content.

    1. Delay or Block Scheduled Maintenance Tasks

    Windows performs regular maintenance tasks in the background which can consume resources.

    Path:
    Computer Configuration > Administrative Templates > Windows Components > Maintenance Scheduler

    Steps:

    1. Double-click Prevent scheduled maintenance during policy-defined active hours
    2. Set to Enabled
    3. Set active hours to match your peak usage time
    4. Apply changes

    This ensures background updates or diagnostics don’t interrupt you.

    1. Disable Windows Error Reporting

    Error reporting can slow down systems and generate unwanted network activity.

    Path:
    Computer Configuration > Administrative Templates > Windows Components > Windows Error Reporting

    Steps:

    1. Double-click Disable Windows Error Reporting
    2. Set to Enabled
    3. Click Apply and OK

    This does not affect your ability to manually check system issues but stops automatic uploads.

    1. Reduce Search Indexing Load

    Search indexing can tax disk usage—especially on HDD systems.

    Path:
    Computer Configuration > Administrative Templates > Windows Components > Search

    Steps:

    1. Double-click Do not allow locations on removable drives to be added to libraries
    2. Enable the setting

    Optionally:

    • Disable Indexing of encrypted files
    • Set indexing to Classic mode to reduce CPU load
    1. Control Scheduled App Updates

    UWP apps auto-update in the background, adding overhead.

    Path:
    Computer Configuration > Administrative Templates > Windows Components > Store

    Steps:

    1. Double-click Turn off Automatic Download and Install of updates
    2. Set to Enabled
    3. Apply and exit

    This stops automatic app updates via Microsoft Store.

    1. Apply Group Policy Changes

    After all changes:

    • Press Windows + X, choose Command Prompt (Admin) or Windows Terminal (Admin)
    • Run the following command:

    bash

    CopyEdit

    gpupdate /force

    You can also reboot your computer for full application.

    Tips for Best Results

    • Combine Group Policy tweaks with Startup program control and disk cleanup
    • Recheck Group Policy settings after major Windows Updates
    • Use Task Manager and Resource Monitor to observe improvements
    • Avoid disabling features critical to updates or security

    Common Mistakes to Avoid

    • Don’t disable core services like Windows Update or Defender through Group Policy unless absolutely necessary
    • Avoid setting overly restrictive policies that may block needed features
    • Keep documentation of all changes for future rollback
    • Always test changes on a non-critical system if used in a business environment

    Conclusion

    Tuning Windows for performance using Group Policy Editor is a powerful yet underused approach. It’s especially helpful for older systems or users who want control without relying on third-party utilities. By disabling visual effects, background apps, error reporting, and unnecessary indexing or updates, you can significantly improve responsiveness and reduce resource usage.

    I’ve applied these policies on many low-spec machines for better speed and fewer interruptions, and the results are consistently noticeable. Take a few minutes to apply the changes, and you’ll likely see your system running leaner and smoother.

  • How to Record Screen on Windows 11 Without Third-Party Software

    How to Record Screen on Windows 11 Without Third-Party Software

    Recording your screen is useful for tutorials, presentations, or capturing gameplay. Windows 11 offers built-in tools to record your screen without needing third-party software. This guide explains how to use native Windows 11 features to record your screen easily and effectively, based on the latest information and personal experience.

    Step 1: Use Xbox Game Bar for Screen Recording

    Windows 11 includes Xbox Game Bar, a powerful overlay tool primarily designed for gamers but usable for any screen recording.

    How to Open Xbox Game Bar

    • Press Windows + G keys simultaneously.
    • The Xbox Game Bar overlay appears with various widgets.

    Start Screen Recording

    • Click the Capture widget (camera icon).
    • Press the Record button (circle icon) to begin recording.
    • Alternatively, press Windows + Alt + R as a shortcut to start and stop recording.
    • The recording status appears on the screen; you can pause or stop recording using controls.

    Step 2: Adjust Xbox Game Bar Settings

    Before recording, you can adjust settings for optimal results:

    • Open Xbox Game Bar.
    • Click the Settings icon.
    • Navigate to the Capturing section.
    • Choose video quality, frame rate (30fps or 60fps), and audio options.
    • Enable microphone capture if you want to record voiceover.

    Configuring these options ensures recordings meet your needs.

    Step 3: Locate and Manage Recorded Videos

    By default, recordings are saved to:

    C:\Users\[Your Username]\Videos\Captures

    You can:

    • Access recordings quickly from the Xbox Game Bar’s Gallery widget.
    • Edit or share videos directly using the Photos app or video editors.

    Step 4: Use PowerPoint for Screen Recording (Optional)

    If you have Microsoft PowerPoint installed, it includes a screen recording feature.

    How to Use PowerPoint Screen Recorder

    • Open PowerPoint and create a new slide.
    • Go to Insert > Screen Recording.
    • Select the screen area to record or full screen.
    • Click Record to start, and use the stop button in the control dock.
    • The recording is inserted directly into the slide.
    • Right-click the video and choose Save Media As to save it as a separate file.

    PowerPoint screen recorder is useful for quick clips integrated into presentations.

    Step 5: Tips for Better Screen Recording

    • Close unnecessary applications to avoid distractions and reduce CPU load.
    • Use a good microphone for clear audio.
    • Record in a quiet environment to minimize background noise.
    • Practice keyboard shortcuts for efficiency.
    • Review recordings for quality before sharing.

    Step 6: Troubleshooting Common Issues

    • If Xbox Game Bar doesn’t open, ensure it’s enabled in Settings > Gaming > Xbox Game Bar.
    • For no audio in recordings, check microphone permissions and audio settings.
    • Recording might fail on older hardware; ensure your device meets minimum requirements.
    • If recording stops unexpectedly, check disk space and system performance.

    Personal Experience

    I found Xbox Game Bar intuitive and reliable for most screen recordings, especially with keyboard shortcuts that simplify the process. For presentations, PowerPoint’s recorder saves time by embedding videos directly.

    Conclusion

    Windows 11 provides easy-to-use built-in tools to record your screen without additional software. Xbox Game Bar is ideal for versatile, high-quality recordings, while PowerPoint suits quick presentation clips. By following these steps, you can create effective screen recordings smoothly.

  • How to Use Samsung Quick Share to Transfer Files

    How to Use Samsung Quick Share to Transfer Files

    Sharing files between devices quickly and effortlessly is essential in today’s fast-paced world. Samsung Quick Share offers a seamless way to transfer photos, videos, documents, and more between Samsung devices without cables or third-party apps. This guide provides a detailed walkthrough on how to use Samsung Quick Share effectively, including setup, file transfer, and troubleshooting.

    What Is Samsung Quick Share?

    Samsung Quick Share is a wireless file-sharing feature built into modern Samsung smartphones and tablets. It uses Wi-Fi Direct and Bluetooth to establish a direct connection between devices, enabling fast transfers with minimal setup. Unlike traditional Bluetooth sharing, Quick Share supports larger files and multiple recipients simultaneously.

    Step 1: Ensure Compatibility and Enable Quick Share

    • Quick Share is available on Samsung devices running One UI 2.1 or later, including Galaxy S20 series and newer.
    • On both the sending and receiving devices, swipe down from the top of the screen to open Quick Settings.
    • Look for Quick Share and tap to enable it.
    • If you don’t see Quick Share, tap the edit button (pencil icon) to add it to Quick Settings.

    Step 2: Prepare the Receiving Device

    • On the receiving Samsung device, make sure Quick Share is turned on.
    • The device will become discoverable for a short time.
    • You can adjust visibility options by tapping the three-dot menu in Quick Share and choosing who can see your device: Contacts only, Everyone, or Hidden.

    Step 3: Select Files to Share

    • Open the Gallery, My Files, or any app where your files are stored.
    • Select the photos, videos, documents, or other files you want to share.
    • Tap the Share icon (usually represented by three connected dots or an arrow).
    • From the sharing options, select Quick Share.

    Step 4: Choose the Receiving Device

    • Your device will scan and display nearby Samsung devices with Quick Share enabled.
    • Tap the name of the device you want to send files to.
    • The receiving device will get a prompt to Accept or Decline the incoming files.

    Step 5: Accept and Receive Files

    • On the receiving device, tap Accept to start the transfer.
    • The transfer progress will display on both devices.
    • Once completed, files will save automatically to the appropriate apps or folders, such as the Gallery for images.

    Step 6: Share with Multiple Devices

    • Quick Share allows sending files to multiple devices at once.
    • After selecting files, choose multiple recipient devices from the list.
    • All recipients will receive prompts to accept the files.

    Tips for Optimal Quick Share Use

    • Keep both devices close to ensure strong connection.
    • Use Wi-Fi rather than mobile data for faster and cost-free transfers.
    • Make sure both devices have the latest software updates for compatibility.
    • Adjust device visibility to Everyone if sharing with new contacts.

    Troubleshooting Common Issues

    • Devices not appearing: Turn Quick Share off and on again on both devices; ensure Bluetooth and Wi-Fi are enabled.
    • Transfer fails or is slow: Restart devices and try again; avoid interference from other wireless signals.
    • File not received: Verify storage space on the receiving device; try sending smaller batches.
    • Quick Share missing: Check software version; update One UI and Samsung apps if needed.

    My Personal Experience

    Using Samsung Quick Share has been a reliable and convenient way to move large videos and photos between my phone and tablet. Its speed and ease of use outperform traditional Bluetooth, and the ability to share with multiple friends at gatherings is invaluable.

    Conclusion

    Samsung Quick Share simplifies wireless file transfer between Samsung devices without cables or complex setup. By enabling Quick Share, selecting files, and choosing recipients, you can quickly share photos, videos, documents, and more. Regularly update your devices and follow the tips above to ensure smooth transfers.

  • how to get Samsung TV Plus on older Samsung TV

    how to get Samsung TV Plus on older Samsung TV

    Samsung TV Plus is a popular free streaming service that offers a wide range of live TV channels, including news, entertainment, sports, and movies. While it comes pre-installed on many newer Samsung Smart TVs, users with older Samsung models may wonder how to access Samsung TV Plus on their devices. This guide provides detailed, researched solutions to get Samsung TV Plus on older Samsung TVs, covering all available methods and troubleshooting tips.

    What Is Samsung TV Plus?

    Samsung TV Plus is an ad-supported streaming service available on Samsung Smart TVs, providing free live channels without the need for subscriptions or additional devices. It is integrated into Samsung’s Tizen OS, available on newer TV models from 2016 onwards.

    Why Is Samsung TV Plus Not Available on Older Samsung TVs?

    Older Samsung TVs, especially those running legacy operating systems or prior to 2016, do not support Samsung TV Plus natively because:

    • Samsung TV Plus requires Tizen OS or compatible firmware.
    • Older models lack app support for this service.
    • Samsung restricts TV Plus availability to newer hardware for performance and licensing reasons.

    Step 1: Check Your Samsung TV Model and Software

    1. Press the Home button on your remote.
    2. Go to Settings > Support > About This TV.
    3. Note your model number and software version.
    4. Verify if your TV is from 2016 or later with Tizen OS installed.
    5. If your TV software is outdated, check for updates under Settings > Support > Software Update.

    If your model is older or does not support Tizen, Samsung TV Plus will not be natively available.

    Step 2: Try to Access Samsung TV Plus App

    • On newer models, Samsung TV Plus is accessible from the Live TV menu or as a dedicated app.
    • On some older models, look in the Apps section for Samsung TV Plus.
    • If unavailable, your TV firmware likely does not support it.

    Step 3: Alternative Methods to Access Samsung TV Plus on Older TVs

    Method 1: Use a Streaming Device with Samsung TV Plus Support

    Devices like Samsung Smart TV Plus compatible streaming sticks, or other smart TV devices (Amazon Fire Stick, Roku, Google Chromecast) may offer the Samsung TV Plus app or alternatives.

    • Connect the streaming device to your older Samsung TV’s HDMI port.
    • Set up the device and download the Samsung TV Plus app if available.
    • Alternatively, use apps like Pluto TV or Xumo which offer similar free live channels.

    Method 2: Screen Mirroring or Casting from Samsung Phone or Tablet

    If you have a Samsung smartphone with Samsung TV Plus:

    • Use Smart View or screen mirroring to cast your phone’s screen to the TV.
    • Connect your phone and TV via Wi-Fi Direct or a local network.
    • Open Samsung TV Plus on your phone and mirror the content.

    This method requires your TV to support screen mirroring but does not require internet on the TV itself.

    Method 3: Connect a Laptop or PC to Your TV

    • Use an HDMI cable to connect a laptop or desktop PC to your TV.
    • Open a web browser and go to the Samsung TV Plus web portal (if available).
    • Stream live channels from your computer to the TV via the HDMI connection.

    Step 4: Update Your TV’s Firmware (If Supported)

    Sometimes, Samsung releases firmware updates adding new features to older TVs.

    • Navigate to Settings > Support > Software Update.
    • Check and install any available updates.
    • After updating, check again for Samsung TV Plus availability.

    Step 5: Consider Upgrading Your TV or Using a Dedicated Streaming Device

    If Samsung TV Plus is critical for your viewing and your older TV cannot support it, upgrading to a newer Samsung Smart TV or purchasing a compatible streaming device is a practical long-term solution.

    Troubleshooting Tips

    • If casting or mirroring is unstable, ensure both devices are on the same network or connected via Wi-Fi Direct.
    • Restart your TV and streaming device to fix connection glitches.
    • Ensure HDMI cables and ports are functioning properly.
    • If Samsung TV Plus app crashes on streaming devices, clear app cache or reinstall.

    My Experience Accessing Samsung TV Plus on Older TVs

    I tested screen mirroring Samsung TV Plus from my Samsung phone to an older TV without Wi-Fi. While the experience was good for casual viewing, occasional lag occurred. Using an Amazon Fire Stick provided a smoother experience with more channel options. Firmware updates on older Samsung models rarely added TV Plus, so external devices remain the best option.

    Summary

    To get Samsung TV Plus on older Samsung TVs:

    • Verify your TV’s model and firmware.
    • Try accessing the app directly if supported.
    • Use external streaming devices compatible with Samsung TV Plus.
    • Cast or mirror Samsung TV Plus from a Samsung phone.
    • Connect a PC via HDMI for web-based streaming.
    • Update TV firmware when possible.
    • Consider upgrading hardware if native support is unavailable.
  • How to Measure Blood Pressure on Samsung Galaxy Watch

    How to Measure Blood Pressure on Samsung Galaxy Watch

    Measuring blood pressure on a Samsung Galaxy Watch is a convenient way to monitor your health. This feature is available on select models and requires initial setup and calibration. In this guide, we’ll walk you through the steps to measure your blood pressure using your Galaxy Watch.

    Compatible Galaxy Watch Models

    Blood pressure monitoring is available on the following Samsung Galaxy Watch models:

    • Galaxy Watch Active2
    • Galaxy Watch3
    • Galaxy Watch4
    • Galaxy Watch4 Classic
    • Galaxy Watch5
    • Galaxy Watch5 Pro
    • Galaxy Watch6
    • Galaxy Watch6 Classic
    • Galaxy Watch7

    Note: Blood pressure monitoring requires a Samsung Galaxy smartphone running Android 7.0 or later.

    Step-by-Step Guide to Measure Blood Pressure

    1. Install Required Apps
    • Samsung Health Monitor App: Ensure the Samsung Health Monitor app is installed on both your Galaxy Watch and Samsung smartphone.
    • Samsung Health App: This app should also be installed on your smartphone to sync health data.
    1. Calibrate Your Galaxy Watch

    Calibration is necessary to ensure accurate blood pressure readings. You’ll need a traditional blood pressure monitor (cuff-based) for this process.

    Calibration Steps:

    1. Wear your Galaxy Watch snugly on one wrist.
    2. Place the cuff of the traditional blood pressure monitor on the opposite arm.
    3. Open the Samsung Health Monitor app on your smartphone.
    4. Follow the on-screen instructions to start the calibration process.
    5. Measure your blood pressure using the traditional monitor.
    6. Enter the systolic and diastolic values into the app when prompted.
    7. Repeat this process two more times within 30 minutes.

    Note: Calibration must be repeated every 28 days to maintain accuracy.

    1. Measure Blood Pressure Using Your Galaxy Watch

    After successful calibration:

    1. Open the Samsung Health Monitor app on your Galaxy Watch.
    2. Select Blood Pressure.
    3. Tap Measure.
    4. Remain still and quiet during the measurement.
    5. Once complete, your systolic and diastolic readings will be displayed.

    Tip: For best results, rest for at least 5 minutes before measuring, and ensure your arm is at heart level.

    Understanding the Limitations

    While the Galaxy Watch provides convenient blood pressure monitoring, it’s important to understand its limitations:

    • Not a Medical Device: The Galaxy Watch is not intended for medical diagnosis or treatment.
    • Calibration Dependency: Accuracy depends on regular calibration with a traditional monitor.
    • Environmental Factors: Movement, temperature, and improper wearing can affect readings.

    Troubleshooting Tips

    • Inaccurate Readings: Ensure the watch is snug on your wrist and that calibration is up to date.
    • App Issues: Restart your devices and ensure all apps are updated.
    • Feature Unavailable: Blood pressure monitoring may not be available in all regions.

    Conclusion

    Monitoring your blood pressure with a Samsung Galaxy Watch is a convenient way to keep track of your health. By following the calibration process and understanding the limitations, you can effectively use this feature as part of your wellness routine.

  • How to Recover Permanently Deleted files in Windows

    How to Recover Permanently Deleted files in Windows

    Accidentally deleting important files can be distressing, especially when they bypass the Recycle Bin. Fortunately, Windows offers several methods to recover permanently deleted files. This guide provides a comprehensive walkthrough to help you restore your lost data.

    Understanding Permanent Deletion in Windows

    When you delete a file using Shift + Delete or empty the Recycle Bin, Windows removes the file’s reference but not the actual data. The space becomes available for new data, but until it’s overwritten, recovery is possible using various tools and features.

    Method 1: Restore from File History

    File History is a built-in Windows feature that automatically backs up files in designated folders.

    Steps:

    1. Open File History:
      • Press Windows + S, type “Restore your files with File History, and select it.
    2. Navigate to the Desired Folder:
      • Browse through the available backups to locate the folder where the deleted file was stored.
    3. Select and Restore:
      • Choose the file or folder you wish to restore and click the Restore button.

    Note: This method works only if File History was enabled prior to the file deletion.

    Method 2: Use Windows File Recovery Tool

    Windows File Recovery is a command-line utility developed by Microsoft to recover deleted files.

    Steps:

    1. Install Windows File Recovery:
      • Download and install the tool from the
    2. Open Command Prompt as Administrator:
      • Press Windows + X and select Windows Terminal (Admin).
    3. Run the Recovery Command:
      • Use the following syntax:

    bash

    CopyEdit

    winfr source-drive: destination-drive: /mode /switches

    Replace source-drive and destination-drive with appropriate drive letters.

      • For example, to recover from drive C: to drive D: using the default mode:

    mathematica

    CopyEdit

    winfr C: D: /regular

    Note: Ensure the destination drive has enough space and is different from the source drive to prevent data overwriting.

    Method 3: Restore Previous Versions

    Windows maintains Previous Versions of files and folders as part of restore points.

    Steps:

    1. Navigate to the Folder:
      • Right-click on the folder that contained the deleted file and select Properties.
    2. Access Previous Versions:
      • Go to the Previous Versions tab.
    3. Select and Restore:
      • Choose a version dated before the deletion and click Restore.

    Note: This method is effective if System Protection was enabled and restore points were created before the file deletion.

    Method 4: Utilize Third-Party Data Recovery Software

    Several reliable third-party tools can assist in recovering permanently deleted files:

    • Recuva:
      • User-friendly interface suitable for beginners.
      • Supports recovery from hard drives, memory cards, and external drives.
    • Disk Drill:
      • Offers deep scanning capabilities.
      • Supports a wide range of file systems and storage devices.
    • TestDisk:
      • Powerful tool for recovering lost partitions and making non-booting disks bootable again.

    Steps:

    1. Install the Chosen Software:
      • Download and install the recovery tool on a different drive than the one containing the deleted files.
    2. Scan for Deleted Files:
      • Use the software to perform a deep scan of the affected drive.
    3. Preview and Recover:
      • Select the files you wish to recover and choose a safe location to save them.

    Note: Avoid installing recovery software on the same drive from which you’re trying to recover data to prevent overwriting.

    Method 5: Check Cloud Backups and Email Attachments

    If you use cloud storage services or have emailed the file:

    • Cloud Services:
      • Check services like OneDrive, Google Drive, or Dropbox for backups or previous versions.
    • Email Attachments:
      • Search your email for sent or received copies of the file.

    Note: Some cloud services have a trash or recycle bin feature where deleted files are stored temporarily before permanent deletion.

    Preventive Measures for Future

    To minimize the risk of permanent data loss:

    • Regular Backups:
      • Use external drives or cloud services to back up important files regularly.
    • Enable File History:
      • Activate File History to automatically back up files in designated folders.
    • Be Cautious with Deletion:
      • Avoid using Shift + Delete unless you’re certain the file isn’t needed.
    • Install Recovery Tools in Advance:
      • Having recovery software installed beforehand can expedite the recovery process.

    Conclusion

    Recovering permanently deleted files in Windows is feasible through various methods, ranging from built-in features like File History and Previous Versions to specialized tools like Windows File Recovery and third-party software. Acting promptly and following the appropriate steps increases the likelihood of successful data recovery.

  • how to monitor CPU and memory usage in Windows Task Manager

    how to monitor CPU and memory usage in Windows Task Manager

    Monitoring your computer’s CPU and memory usage is essential for maintaining optimal performance and diagnosing potential issues. Windows Task Manager provides a comprehensive overview of system resource utilization, allowing users to identify and manage resource-intensive processes effectively.

    Accessing Task Manager

    There are several methods to open Task Manager:

    • Keyboard Shortcut: Press Ctrl + Shift + Esc to launch Task Manager directly.
    • Start Menu: Right-click on the Start button and select Task Manager.
    • Run Command: Press Windows + R, type taskmgr, and press Enter.

    Understanding the Processes Tab

    Upon opening Task Manager, the Processes tab displays a list of all running applications and background processes. This tab provides real-time data on resource usage:

    • CPU Column: Shows the percentage of CPU resources each process is consuming.
    • Memory Column: Displays the amount of RAM each process is using.

    Steps to Monitor Processes:

    1. Click on the Processes tab.
    2. Click on the CPU or Memory column headers to sort processes by resource usage.
    3. Identify processes with high resource consumption.
    4. To terminate a process, right-click on it and select End Task.

    Note: Be cautious when ending processes, as terminating critical system processes can cause instability.

    Utilizing the Performance Tab

    The Performance tab offers a graphical representation of system resource usage over time. It provides detailed insights into CPU and memory performance:

    • CPU Section:
      • Displays real-time CPU usage percentage.
      • Shows information about the CPU, including its speed and the number of cores.
      • Provides a graph illustrating CPU usage trends.
    • Memory Section:
      • Indicates total RAM, available memory, and memory in use.
      • Presents a graph showing memory usage over time.
      • Details memory composition, including cached and committed memory.

    Steps to Access Performance Data:

    1. Click on the Performance tab.
    2. Select CPU or Memory from the left sidebar to view detailed information.

    Advanced Monitoring with Resource Monitor

    For more granular analysis, Windows offers the Resource Monitor:

    1. In the Performance tab of Task Manager, click on Open Resource Monitor at the bottom.
    2. Navigate to the CPU and Memory tabs to view detailed usage statistics.

    Resource Monitor provides insights into individual services, associated handles, and modules, offering a deeper understanding of system resource allocation.

    Tips for Effective Monitoring

    • Regular Checks: Periodically monitor system resources to identify unusual activity or resource hogs.
    • Startup Programs: Manage startup applications via the Startup tab to prevent unnecessary programs from consuming resources at boot.
    • Updates: Ensure Windows and all drivers are up to date to maintain optimal performance.
    • Malware Scans: Run regular antivirus scans to detect and remove malicious software that may consume resources.

    Conclusion

    Monitoring CPU and memory usage through Windows Task Manager is a straightforward yet powerful method to ensure your computer operates efficiently. By understanding and managing resource consumption, you can enhance system performance and preempt potential issues.

  • How to Set up a PIN or Fingerprint login in Windows 11

    How to Set up a PIN or Fingerprint login in Windows 11

    Setting up a PIN or fingerprint login in Windows 11 enhances both security and convenience. By using Windows Hello, you can sign in quickly without typing a full password each time. This guide provides detailed steps to configure these sign-in options.

    Why Use Windows Hello?

    Windows Hello offers a more secure and personalized way to access your device. Unlike traditional passwords, which can be vulnerable to phishing or hacking, Windows Hello credentials are stored locally on your device and are not transmitted over the internet. This reduces the risk of credential theft.

    Setting Up a PIN in Windows 11

    A PIN is a quick and secure alternative to a password. It’s device-specific and can be used even when your device is offline.

    Steps to Set Up a PIN:

    1. Open Settings:
      • Press Windows + I to open the Settings app.
    2. Navigate to Sign-in Options:
      • Click on Accounts in the left sidebar.
      • Select Sign-in options on the right pane.
    3. Add a PIN:
      • Under Ways to sign in, find PIN (Windows Hello).
      • Click Add.
    4. Verify Identity:
      • Enter your Microsoft account password when prompted.
    5. Create Your PIN:
      • Enter a new PIN. You can include letters and symbols for added security by selecting the appropriate checkbox.
      • Confirm the PIN and click OK.

    Your PIN is now set up and can be used to sign in to your device.

    Setting Up Fingerprint Recognition in Windows 11

    Fingerprint recognition provides a fast and secure way to unlock your device. Ensure your device has a fingerprint scanner and that the necessary drivers are installed.

    Steps to Set Up Fingerprint Recognition:

    1. Open Settings:
      • Press Windows + I to open the Settings app.
    2. Navigate to Sign-in Options:
      • Click on Accounts in the left sidebar.
      • Select Sign-in options on the right pane.
    3. Set Up Fingerprint Recognition:
      • Under Ways to sign in, find Fingerprint recognition (Windows Hello).
      • Click Set up.
    4. Get Started:
      • Click the Get started button.
    5. Verify Identity:
      • Enter your PIN when prompted.
    6. Scan Your Finger:
      • Follow the on-screen instructions to scan your finger multiple times for better accuracy.
    7. Complete Setup:
      • Once the fingerprint is successfully added, click Close.

    You can now use your fingerprint to sign in to your device.

    Managing Sign-in Options

    Windows 11 allows you to manage your sign-in options easily:

    • Change PIN:
      • Go to Settings > Accounts > Sign-in options > PIN (Windows Hello).
      • Click Change PIN and follow the prompts.
    • Remove PIN or Fingerprint:
      • In the respective sections under Sign-in options, click Remove and confirm your choice.
    • Add Additional Fingerprints:
      • Under Fingerprint recognition (Windows Hello), click Add another finger and follow the setup process.

    Troubleshooting Tips

    • Fingerprint Scanner Not Working:
      • Ensure the scanner is clean and free from debris.
      • Update the fingerprint scanner driver via Device Manager.
    • Cannot Add PIN:
      • Make sure you’re signed in with a Microsoft account.
      • Check for Windows updates that might address the issue.

    Conclusion

    Setting up a PIN or fingerprint login in Windows 11 enhances your device’s security and streamlines the sign-in process. By following the steps outlined above, you can configure these features to suit your preferences. Regularly updating your sign-in methods and ensuring your device’s hardware is functioning correctly will maintain optimal security and convenience.

  • How to Enter Safe Mode in Windows

    How to Enter Safe Mode in Windows

    Safe Mode is a diagnostic startup mode in Windows that allows you to troubleshoot and fix issues by loading the operating system with a minimal set of drivers and services. This environment is particularly useful when dealing with persistent crashes, system instability, or malware infections. In this guide, we’ll explore various methods to enter Safe Mode across different versions of Windows, including Windows 11, 10, and 7.

    Understanding Safe Mode Options

    Before diving into the methods, it’s essential to understand the different Safe Mode options available:

    • Safe Mode: Starts Windows with the most basic drivers and services.
    • Safe Mode with Networking: Includes network drivers and services needed to access the internet and other computers on your network.
    • Safe Mode with Command Prompt: Loads a Command Prompt window instead of the usual Windows interface, useful for advanced troubleshooting.

    Method 1: Using Settings (Windows 11 and 10)

    If your system is operational, you can access Safe Mode through the Settings menu:

    1. Open Settings:
      • Press Windows + I to open the Settings window.
    2. Navigate to Recovery Options:
      • For Windows 11: Go to System > Recovery.
      • For Windows 10: Go to Update & Security > Recovery.
    3. Initiate Advanced Startup:
      • Under the Advanced startup section, click Restart now.
    4. Access Startup Settings:
      • After the system restarts, select Troubleshoot > Advanced options > Startup Settings > Restart.
    5. Choose Safe Mode Option:
      • Once the system restarts, you’ll see a list of options.
        • Press 4 or F4 for Safe Mode.
        • Press 5 or F5 for Safe Mode with Networking.
        • Press 6 or F6 for Safe Mode with Command Prompt.

    Method 2: From the Sign-In Screen (Windows 11 and 10)

    If you’re unable to access the desktop but can reach the sign-in screen:

    1. Restart with Shift Key:
      • Hold down the Shift key and click on the Power icon at the bottom right corner.
      • Select Restart while still holding the Shift key.
    2. Follow Startup Settings:
      • After the system restarts, navigate to Troubleshoot > Advanced options > Startup Settings > Restart.
    3. Select Safe Mode Option:
      • Choose the appropriate Safe Mode option as described in Method

    Method 3: Using System Configuration (msconfig) (All Windows Versions)

    The System Configuration tool allows you to set the system to boot into Safe Mode:

    1. Open Run Dialog:
      • Press Windows + R, type msconfig, and press Enter.
    2. Configure Boot Options:
      • In the System Configuration window, go to the Boot tab.
      • Under Boot options, check the box for Safe boot.
      • Select the desired Safe Mode type:
        • Minimal: Standard Safe Mode.
        • Alternate shell: Safe Mode with Command Prompt.
        • Network: Safe Mode with Networking.
    3. Apply and Restart:
      • Click OK, then Restart.

    Note: To exit Safe Mode, repeat the steps and uncheck the Safe boot option.

    Method 4: Interrupting the Normal Boot Process (Windows 11 and 10)

    If Windows fails to start normally, you can force it into the Windows Recovery Environment (WinRE):

    1. Force Shutdown:
      • Turn on your PC and, as soon as Windows starts to load, press and hold the power button until the PC shuts down.
      • Repeat this process three times.
    2. Access WinRE:
      • On the third restart, Windows will enter the Recovery Environment.
    3. Navigate to Safe Mode:
      • Select Troubleshoot > Advanced options > Startup Settings > Restart.
      • Choose the desired Safe Mode option.

    Method 5: Using the F8 Key (Windows 7 and Earlier)

    For older versions of Windows:

    1. Restart Your Computer:
      • Turn off your computer and turn it back on.
    2. Press F8:
      • Before the Windows logo appears, press the F8 key repeatedly
    3. Select Safe Mode:
      • In the Advanced Boot Options menu, use the arrow keys to select:
        • Safe Mode
        • Safe Mode with Networking
        • Safe Mode with Command Prompt
      • Press Enter.

    Exiting Safe Mode

    To return to normal mode:

    • Restart Your Computer:
      • Simply restarting your PC should exit Safe Mode.
    • Using System Configuration:
      • If you used msconfig to enter Safe Mode, reopen it, uncheck Safe boot, and restart your computer.

    Conclusion

    Entering Safe Mode is a vital step in diagnosing and resolving various system issues in Windows. Whether you’re dealing with software conflicts, driver problems, or malware infections, Safe Mode provides a controlled environment to troubleshoot effectively. By following the methods outlined above, you can access Safe Mode across different Windows versions and address the issues affecting your system’s performance.

  • how to Create an SEO Content Strategy from Scratch

    how to Create an SEO Content Strategy from Scratch

    Okay, building a website or starting a blog can feel overwhelming, especially when you know you need content to rank in search engines, but you’re not sure what content to create or where to even start. That’s where an SEO content strategy comes in. It’s essentially your roadmap for creating content that not only appeals to your audience but also has a real chance of ranking in search results and driving organic traffic.

    You can’t just randomly publish articles and hope for the best. A strategy gives you direction, helps you use your resources effectively, and increases your chances of actually achieving your goals. I’ve seen the difference a solid strategy makes compared to just winging it – it’s night and day.

    Let’s walk through how to create an SEO content strategy from scratch.

    Step 1: Define Your Goals

    Why are you creating content in the first place? What do you want it to achieve for your website or business? Your goals will shape every other step in your strategy.

    • How to do it: Think about the big picture. Do you want to:
      • Increase website traffic (specifically from search engines)?
      • Generate leads (get people to sign up or contact you)?
      • Make sales?
      • Build brand awareness or authority in your niche?
      • Reduce customer support questions by providing helpful information?
    • Keep it focused: Start with one or two primary goals. For example, “Increase organic traffic by 20% in six months” or “Generate 10 leads per month from blog content.”

    Step 2: Understand Your Target Audience

    Who are you trying to reach with your content? What are their problems, questions, needs, and interests? You need to create content for them, not just for search engines.

    • How to do it:
      • Create audience personas: Give your ideal readers/customers a name, demographics, job, goals, challenges, and online habits.
      • Think about their questions: What information are they looking for related to your topic or business? What keeps them up at night that your content can help solve?
      • Where do they hang out online? (For later promotion, but good to know now).
    • My Experience: Skipping this step means you might write great content that nobody searching for it actually wants to read. Always start with who you’re serving.

    Step 3: Conduct Thorough Keyword Research

    Now that you know your goals and audience, it’s time to find out what words and phrases they actually use when searching online for topics related to your site. This is the foundation of your SEO strategy.

    • How to do it:
      • Brainstorm initial ideas: What terms come to mind related to your niche?
      • Use keyword research tools:
        • Free: Google Keyword Planner, Google Search Console (see what terms you already rank for), AnswerThePublic (find questions people ask), also look at Google Autocomplete suggestions and “People also ask” boxes.
        • Paid: Ahrefs, Semrush, Moz Keyword Explorer, etc., offer more detailed data like search volume, competition, and related keywords.
      • Look for relevant keywords: Find terms with a reasonable search volume that are relevant to your audience and goals.
      • Understand Search Intent: This is CRITICAL. Why is someone searching for that keyword?
        • Informational: They want information (“how to tie a tie,” “what is photosynthesis”). Your content should educate.
        • Navigational: They want to go to a specific website (“facebook login,” “amazon”). Probably not a keyword to target unless it’s your brand name.
        • Commercial Investigation: They are researching before buying (“best wireless headphones,” “SEO tools comparison”). Your content should help them evaluate options.
        • Transactional: They want to buy something (“buy running shoes online,” “SEO software pricing”). Your content should facilitate a purchase.
      • Gather a list: Collect a list of potential keywords and phrases, noting their search intent and potential relevance.

    Step 4: Analyze the Competition

    See what content your competitors (the sites ranking for your target keywords) are creating. This isn’t about copying; it’s about identifying opportunities and understanding what works.

    • How to do it:
      • Identify competitors: Who ranks in the top 10 for your main keywords?
      • Analyze their content: What topics do they cover? What formats do they use (blog posts, guides, videos)? How detailed is their content? What keywords are they targeting?
      • Find content gaps: Are there topics or keywords your competitors aren’t covering well, or at all, that are relevant to your audience?

    Step 5: Map Keywords to the Buyer’s Journey

    Align the keywords you found with your audience’s journey from knowing nothing about a topic or problem to becoming a customer. This helps ensure you have content for people at different stages.

    • How to do it: Categorize your keywords based on search intent and which stage of the buyer’s journey they fit into:
      • Awareness: Informational keywords (e.g., “what is SEO,” “how does content marketing work”). Content: Blog posts, guides, infographics.
      • Consideration: Commercial investigation keywords (e.g., “best keyword research tools,” “SEO software reviews”). Content: Comparison articles, reviews, case studies.
      • Decision: Transactional keywords (e.g., “SEO software pricing,” “buy SEO service”). Content: Product pages, service pages, pricing guides, testimonials.

    Step 6: Plan Your Content Topics and Formats

    Based on your keyword research, audience understanding, and competitive analysis, it’s time to brainstorm specific content ideas. Think about how you can create the best piece of content on a given topic that serves the user’s intent.

    • How to do it:
      • Generate ideas: For each target keyword or group of related keywords, brainstorm potential article titles or content angles.
      • Choose formats: What’s the best way to deliver this information? A detailed blog post? A video tutorial? An interactive tool? A downloadable guide?
      • Consider Topic Clusters: A modern SEO approach. Choose a broad topic (your “pillar”). Create a comprehensive Pillar Page covering the main aspects. Then, create several detailed articles ( cluster content) that dive deep into specific sub-topics, linking back to the pillar page and to each other. This helps establish your authority on the broad topic.
    • My Experience: I used to just think about individual articles. Planning in topic clusters changed how I approach content – it creates a much stronger internal linking structure and signals topical authority to Google more effectively.

    Step 7: Create a Content Calendar

    Organize your approved content ideas into a schedule. This keeps you consistent and helps you visualize your content pipeline.

    • How to do it:
      • Use a spreadsheet, a project management tool (like Trello, Asana), or a dedicated editorial calendar tool.
      • List your content pieces, target keywords, format, target audience, and a planned publication date.
      • Assign responsibilities if working with a team.

    Step 8: Establish Content Creation Guidelines

    Define the standards for quality and SEO best practices that all your content should meet.

    • How to do it: Create a checklist or guide covering things like:
      • Target word count (based on competitor analysis and topic depth).
      • Tone and style.
      • How to incorporate keywords (naturally, in title, headings, body).
      • On-page SEO elements: Title tags, meta descriptions (remember Step 7 from the previous guide!), header tags (H1, H2, etc.), internal linking (especially for topic clusters!), image alt text, URL structure.
      • Quality standards: Originality, accuracy, readability, engagement.

    Step 9: Plan for Content Promotion

    Creating great content is only half the battle. You need a plan to get it in front of your audience. While SEO helps people find it over time, initial promotion can give it a boost.

    • How to do it: Decide how you will promote each piece: Social media shares, email newsletter, outreach to people mentioned or who might find it valuable, paid promotion.

    Step 10: Measure and Analyze Your Results

    Once your content is out there, track its performance. This data tells you what’s working and where you need to adjust your strategy.

    • How to do it:
      • Use Google Analytics: Track organic traffic to your pages, bounce rate, time on page, conversions.
      • Use Google Search Console: Monitor keyword rankings, click-through rate (CTR), and impressions.
      • Use your SEO tools: Track keyword ranking progress.
      • Analyze: Which types of content perform best? Which keywords are driving traffic? Which pages lead to conversions?
    • My Experience: This step is crucial. I thought some articles would do well, but the data showed others were performing better. Use the data to refine your keyword targeting, content types, and overall strategy. SEO is iterative!

    Creating an SEO content strategy from scratch takes effort, but following these steps gives you a clear framework. It moves you from guessing to having a deliberate plan for attracting organic traffic and achieving your goals.

  • How to Install OpenAI API on Windows with Python

    How to Install OpenAI API on Windows with Python

    The OpenAI API gives developers and enthusiasts access to powerful AI models like the GPT series for text generation, DALL-E for image creation, and more. Using the official OpenAI Python library is the most common way to interact with this API, and setting it up on Windows is straightforward once you have Python ready.

    Having the OpenAI API accessible via Python on your Windows machine opens up a world of possibilities for building your own applications, automating tasks involving AI, or experimenting with the latest models. I remember the first time I successfully made an API call and got a response from a powerful language model right in my script – it felt like magic!

    Before you install the library and start coding, there’s a crucial step: getting your API key.

    What You Need

    1. Python installed on your Windows computer (refer to a guide on installing Python if needed).
    2. pip (comes with Python) for installing the necessary library.
    3. An OpenAI account.
    4. An OpenAI API Key. IMPORTANT: Using the OpenAI API costs money based on your usage (how many requests you make and how much text/data is processed). Check OpenAI’s pricing page before you start.
    5. A text editor or IDE (like VS Code or Notepad) to write your Python code.

    How to Get Your OpenAI API Key

    Your API key is like a password that authenticates your requests and links them to your OpenAI account for billing. Keep it secure!

    1. Go to the official OpenAI website (openai.com) and log in to your account.
    2. Once logged in, navigate to the API section. Look for options related to “API keys” or “API settings” (often found by clicking your profile icon).
    3. Click on ‘Create new secret key’.
    4. Give your key an optional name (e.g., “My Windows Development Key”) and click ‘Create secret key’.
    5. Your secret key will be displayed ONCE. Copy it immediately and save it in a secure place (like a password manager or a strongly encrypted note). Do NOT close the window or navigate away without copying the key, as you won’t be able to see it again. If you lose it, you’ll have to generate a new one.
    6. Click ‘Done’.

    CRITICAL SECURITY WARNING: Your API key grants access to your account and can incur costs. Never share your API key publicly or embed it directly in code that you might share or upload to platforms like GitHub.

    How to Install the OpenAI Python Library on Windows

    The OpenAI Python library makes it easy to interact with the API from your scripts.

    Step 1: Open Command Prompt

    • Click the Start button and search for “cmd” or “Command Prompt”.
    • Click on ‘Command Prompt’ to open it.

    Step 2: Activate Virtual Environment (Recommended)

    If you’re using Python virtual environments (highly recommended for project isolation), activate the environment where you want to install the library.

    • Navigate to your project directory if necessary (cd path\to\your\project).
    • Activate the environment: my_env_name\Scripts\activate (replace my_env_name with the name of your virtual environment).

    Step 3: Install the Library

    Use pip to install the library.

    • In your activated Command Prompt, run the command:

    Bash

    pip install openai

    • Pip will download and install the latest version of the OpenAI Python library and its dependencies.

    Step 4: Verify Installation (Optional)

    You can check if the library was installed correctly:

    • While in your activated environment, run: pip list
    • Look for openai in the list of installed packages.

    How to Use Your API Key Securely

    As mentioned, don’t put your API key directly in your code. The recommended way to provide your API key to the library is by setting it as an environment variable. The openai library automatically looks for an environment variable named OPENAI_API_KEY.

    How to Set the OPENAI_API_KEY Environment Variable on Windows:

    1. Search for “Environment Variables” in the Windows search bar.
    2. Click on “Edit the system environment variables”.
    3. In the System Properties window, click the ‘Environment Variables…’ button 1 at the bottom.
    4. Under either “User variables for [Your Username]” (for access only by your user) or “System variables” (for access by all users – less common for personal API keys), click ‘New…’.
    5. In the ‘New User Variable’ (or System Variable) window:
      • For Variable name, type: OPENAI_API_KEY
      • For Variable value, paste the secret key you copied from the OpenAI website.
    6. Click ‘OK’ on all open windows (New Variable, Environment Variables, System Properties) to save the changes.
    7. CRITICAL: For the changes to take effect, you need to restart your computer or, at minimum, close and reopen any Command Prompt or PowerShell windows you plan to use to run your Python scripts.

    How to Make Your First API Call (Simple Python Example)

    Now that the library is installed and your API key is set as an environment variable, let’s write a simple script to test it.

    Step 1: Open Your Code Editor

    • Open your preferred text editor or IDE on your Windows laptop.
    • Create a new file.

    Step 2: Write the Code

    Paste the following simple code into the file. This code uses the openai library to ask a question to a basic chat model and prints the response.

    Python

    # Import the OpenAI library

    import openai

    import os # Import the os module to potentially read environment variables

    # The library automatically reads the OPENAI_API_KEY environment variable

    # You don’t need to set openai.api_key here if the environment variable is set correctly

    try:

    # Create a chat completion

    # Using a simple model like ‘gpt-3.5-turbo’ for a quick test

    chat_completion = openai.chat.completions.create(

    model=”gpt-3.5-turbo”,

    messages=[

    {“role”: “system”, “content”: “You are a helpful assistant.”},

    {“role”: “user”, “content”: “What is the capital of France?”}

    ]

    )

    # Print the response from the model

    print(“AI Response:”)

    print(chat_completion.choices[0].message.content)


    except openai.AuthenticationError:

    print(“Error: Authentication failed. Make sure your OPENAI_API_KEY environment variable is set correctly and is valid.”)

    print(“Current OPENAI_API_KEY environment variable value:”, os.getenv(“OPENAI_API_KEY”)) # Optional: help debug if variable is empty


    except Exception as e:

    print(f”An error occurred: {e}”)


    Step 3: Save the File

    • Save the file with a .py extension (e.g., test_openai.py) in your project directory.

    Step 4: Run the Script

    • Open Command Prompt.
    • Navigate to the directory where you saved the file (cd path\to\your\project).
    • Activate your virtual environment if you used one (my_env_name\Scripts\activate).
    • Run the script using the Python interpreter: python test_openai.py

    Step 5: See the Output

    If everything is set up correctly and your API key is valid, the script will connect to the OpenAI API (this uses a small amount of your usage quota), and you should see the AI’s response printed in the Command Prompt window, likely stating that the capital of France is Paris.

    What You Can Do Next

    With the OpenAI Python library installed and configured, you can explore many other API capabilities:

    • More complex chat conversations.
    • Generating different creative text formats (poems, code, scripts).
    • Generating images with DALL-E.
    • Creating embeddings for text similarity tasks.
    • Using other models offered by OpenAI.

    Installing the OpenAI API client on Windows with Python is primarily about setting up your Python environment, installing the necessary library using pip, and most importantly, securely configuring your API key using an environment variable. Once these steps are complete, you can unlock the power of advanced AI models directly from your scripts. Remember to monitor your usage, as API calls incur costs.

  • How to Create a Podcast Using AI tools

    How to Create a Podcast Using AI tools

    Safari is the default web browser on iPhones and iPads. This means that whenever you tap on a link in an email, a message, or almost any other app, it will open in Safari. For many people, Safari works perfectly well. But if you prefer using a different browser, like Google Chrome, Mozilla Firefox, Microsoft Edge, or another alternative, you might want links to open in your preferred app automatically. This became possible with iOS 14 (and iPadOS 14) and later versions. I switched to using a different browser on my iPhone a while back, and setting it as the default made everything much more convenient; links stopped opening in Safari unexpectedly.

    Changing the default browser on your iOS device is a simple process, but it requires that you have the alternative browser app installed on your iPhone or iPad first and that your device is running a recent version of iOS. Here’s how to do it.

    Prerequisites:

    1. iOS 14 or Later: Ensure your iPhone or iPad is updated to at least iOS 14 or iPadOS 14. The ability to change the default browser was introduced in these versions. You can check your iOS version in Settings > General > About > iOS Version.
    2. The Browser App Installed: Download and install the alternative web browser app you want to use from the App Store.

    Step 1: Open the Settings App

    • Find the Settings app icon on your iPhone or iPad’s home screen. It looks like a set of grey gears.
    • Tap on the Settings icon to open the app.

    Step 2: Scroll Down to the Browser App

    • In the Settings menu, scroll down the list of apps you have installed on your device. The apps are usually listed alphabetically after the main system settings.
    • Find and tap on the name of the browser app you want to set as your default (e.g., “Chrome,” “Firefox,” “Edge”).

    How to Find It: Just scroll down through the list of all the applications installed on your phone.

    Step 3: Tap on “Default Browser App”

    • Within the settings for that specific browser app, look for an option that says Default Browser App.”
    • Tap on “Default Browser App.”

    How to Know if the Option is There: If you don’t see the “Default Browser App” option listed in the settings for that browser, it might mean the app does not support being set as the default browser, or your iOS version is older than 14. Most major third-party browsers support this feature.

    Step 4: Select Your Preferred Browser

    • On the “Default Browser App” screen, you will see a list of the web browsers installed on your device that support being set as the default.
    • Tap on the name of the browser you want to use as your default.
    • A blue checkmark will appear next to the browser you selected, indicating that it is now the default.

    How to Confirm: Once you tap on your preferred browser, the checkmark confirms your selection. You can then navigate back out of the Settings app.

    Putting it into Practice

    Once you have completed these steps, any time you tap on a web link from another app (like Mail, Messages, Notes, or a third-party app), it will automatically open in the browser app you selected as your default. You can still use Safari by opening it directly, but links from other apps will no longer automatically go there. It felt so much more seamless once all my links started opening in my preferred browser.

    Changing Back to Safari (or Another Browser)

    If you change your mind later and want to switch your default browser back to Safari or select a different alternative, simply repeat these steps. Go back into Settings, find the browser app you want to use as default, tap on “Default Browser App,” and select your choice from the list.

    Changing the default browser on your iPhone or iPad is a quick and easy way to customize your iOS experience and ensure links open in the browser you prefer, enhancing your Browse workflow.

    SEO Meta Description:

    Change the default browser on your iPhone or iPad (iOS 14+). Learn how to set Chrome, Firefox, or other browsers as default step-by-step.

    Write detailed

    explainer how to article on “How to Create a Podcast Using AI tools” by following these

    instructions strictly:

    • Browse the internet to research and get

    latest accurate information on the topic before writing the content. Read

    through existing web content on the topic (e.g., blog posts, articles, and

    guides). Research what other people are saying about the topic on platforms

    like Reddit and Quora.

    • Please make sure the content should

    be written as a how-to article only.

    • Keep your writing style simple and

    concise, use clear and straightforward language, write short and impactful

    sentences. Consider yourself a native English human writer.

    • Don’t just copy or restate content

    from other sources. Instead, write thoroughly well researched, accurate, and

    informative material that demonstrates experience, expertise,

    authoritativeness, and trustworthiness on the topic like a human. Humanise the

    content.

    • Write step by step guide to explain

    the solution of the problem. Cover all the possible solutions and ways of

    fixing or solving the given problem or issue.

    • Write in simple easy to understand

    English. Always talk about your personal experiences with the topic.

    • Don’t make factual errors. Use

    keywords naturally throughout; bold important ones. Break up the article for

    readability and scanning.

    • Content should clearly demonstrate

    first-hand expertise and a depth of knowledge on the topic.

    • Create well-researched, accurate, and

    informative content that brings value.

    • Always stick to the requested output

    by following this prompt completely.

    • Refrain from using adjectives or

    adverbs excessively.

    • Provide all the necessary information

    available on the topic. Go in details and explain properly wherever needed.

    • Follow all recommended on-page SEO

    guidelines by Google while writing the content.

    for the article under 160 characters.

    Show thinking

    Starting a podcast might seem daunting, requiring skills in writing, recording, editing, and production. But Artificial Intelligence (AI) tools are making podcast creation more accessible, automating various parts of the process. You can use AI to help brainstorm ideas, write scripts, generate audio, edit, and even promote your show. I started experimenting with AI for some of the more tedious parts of content creation, and I was surprised at how much time it saved and how it helped refine my workflow.

    Creating a podcast using AI tools involves leveraging technology at different stages of production. Here’s a how-to guide to show you how AI can assist you in building your podcast.

    Step 1: Planning and Scripting with AI

    Every podcast starts with an idea and a plan. AI can jumpstart your creativity and help structure your episodes.

    • Idea Generation: If you’re stuck for topics, AI tools can help.
      • Use large language models (like ChatGPT or similar AI writing platforms) and give them prompts about your podcast’s theme or niche. Ask for episode ideas, angles, or series concepts.
    • Script Outlining and Writing: AI can assist with structuring your episode and even drafting sections of your script.
      • Provide AI with your topic and key points. Ask it to create an outline for an episode.
      • Give AI the outline or specific points and ask it to write introductions, transitions, or even full segments of your script.

    How to Use AI for Scripting: Treat AI as a co-writer or an assistant. It can overcome writer’s block and provide a solid starting point, but always review and edit the AI-generated content to ensure it sounds like you and fits your podcast’s style and voice. AI helped me brainstorm different ways to structure an interview episode, giving me options I hadn’t considered.

    Step 2: Audio Generation or Enhancement with AI

    This is where you get the voice for your podcast. AI offers options for both generating voices from text or improving recorded human audio.

    • AI Voice Generation (Text-to-Speech): If you don’t want to use your own voice or hire voice actors, AI can create narration from your script.
      • Use AI text-to-speech tools (many are available online or integrated into audio platforms).
      • Input your script or text.
      • Choose from various AI voices (male, female, different accents, and tones).
      • Generate the audio files.
    • AI Voice Cloning: Some advanced tools can create an AI voice based on a sample of your own voice.
    • AI for Human Voice Enhancement: If you record your own voice or interview guests, AI can improve the audio quality.
      • Use AI tools integrated into audio editors or dedicated AI audio enhancers.
      • These tools can automatically improve clarity, adjust tone, and make voices sound more professional.

    How to Generate/Enhance Audio: For fully AI-generated podcasts, text-to-speech is the core. Experiment with different AI voices to find one that fits your podcast’s personality. If you’re using human voices, AI enhancement can significantly clean up recordings made even with basic equipment. I was amazed the first time I heard AI turn a somewhat noisy recording into clear audio.

    Ethical Considerations with AI Voices: If using AI voices, especially clones of real voices, be mindful of ethical implications and potential copyright issues. Be transparent with your audience if the voice is AI-generated. Get proper consent if cloning a voice.

    Step 3: Audio Editing and Post-Production with AI

    Editing can be time-consuming, but AI can automate common tasks like noise reduction, removing filler words, and balancing audio levels.

    • AI Noise Reduction: Remove background noise, hums, or other unwanted sounds.
      • Many AI audio editing tools or dedicated noise reduction services offer this feature. Upload your audio, and AI analyzes and cleans the track.
    • AI Filler Word and Silence Removal: Automatically identify and remove “ums,” “ahs,” pauses, and long silences.
      • Some AI editing platforms can analyze transcripts to quickly cut these out of the audio.
    • AI Audio Mastering: Optimize the overall sound quality, loudness, and clarity of your finished episode for consistent playback across different devices and platforms.
      • AI mastering tools analyze your mixed audio and apply professional-grade processing.

    How to Edit with AI: Use AI tools to handle the repetitive cleanup tasks. This frees you up to focus on the creative edits, like arranging segments or adding music. AI tools can quickly identify and remove awkward pauses that I might miss during manual editing.

    Step 4: Generate Transcripts and Show Notes with AI

    Providing transcripts makes your podcast accessible and improves its searchability. Show notes help listeners find resources mentioned in the episode. AI can automate both.

    • AI Transcription: Convert your audio into text.
      • Many AI transcription services offer high accuracy and can differentiate between speakers. Upload your audio, and AI provides a transcript.
    • AI Show Notes Generation: Summarize your episode and create key takeaways or bullet points for your show notes.
      • Provide AI with your transcript or a summary of the episode. Ask it to generate show notes, including timestamps if your transcription tool supports it.

    How to Generate Text Content: AI significantly speeds up the process of getting a written version of your podcast. This is valuable for accessibility and creating supporting content for your website or social media.

    Step 5: Create Cover Art and Promotional Materials with AI

    Visually representing your podcast is important for attracting listeners. AI can help with design tasks.

    • AI Image Generators: Create unique cover art for your podcast.
      • Use AI image generation tools. Provide prompts describing the style, theme, and elements you want in your cover art.
      • Refine the generated images until you get something you like.
    • AI for Promotional Content: Get ideas or drafts for social media posts, audiograms (waveform videos with audio), or other promotional materials.
      • Use AI writing tools (Step 1) to generate social media captions or marketing copy based on your episode’s content.

    How to Create Visuals/Promo: AI image generators can quickly produce multiple cover art options based on your ideas. AI can also help draft engaging text to promote your episodes on social media.

    Limitations and the Human Touch

    While AI is powerful, it has limitations. AI-generated voices can sometimes sound unnatural or lack the nuance of human emotion. AI scripts might feel generic. Full automation might lack the authentic connection listeners often seek in podcasts.

    How to Address Limitations:

    • Human Review and Editing: Always review and refine AI-generated content (scripts, audio, text) to ensure quality, accuracy, and authenticity.
    • Combine AI with Human Elements: Use AI for specific tasks (like editing or transcription) while providing the human voice and creative direction yourself.
    • Focus on Storytelling: Whether human or AI-assisted, a compelling narrative or interesting conversation is key to a good podcast.

    Creating a podcast with AI tools doesn’t mean you just push a button and a finished podcast appears. It’s about using these tools strategically to assist with tasks, overcome technical hurdles, and streamline your workflow. By understanding what AI can do at each stage, from planning to promotion, you can leverage this technology to bring your podcast idea to life more efficiently. Experimenting with different AI tools helped me find the right balance between automation and maintaining the personal touch that makes a podcast engaging.

  • How to Protect Your Data While Using AI Applications

    How to Protect Your Data While Using AI Applications

    AI applications like chatbots, image generators, and writing assistants have become incredibly useful tools for work, creativity, and everyday tasks. They can help write emails, generate images from text descriptions, summarize information, and much more. It’s easy to get caught up in the convenience, but as you interact with these tools, you’re providing them with data – the text you type, the files you upload, the questions you ask. This brings up an important question: What happens to your data?

    Protecting your data while using AI apps is essential for maintaining your privacy and security. While AI providers have their own policies, there are concrete steps you can take to minimize risks. I’ve become much more aware of data privacy when using online tools, including AI, and taking these steps gives me more confidence.

    This guide will show you how to use AI applications safely by protecting your personal and sensitive information.

    Why Data Privacy Matters with AI

    When you use an AI application, especially one that’s online, your data is processed on servers controlled by the AI provider. Here’s why that needs your attention:

    • Training Data: Many AI providers use the data you input (your prompts and interactions) to train and improve their models. If you include sensitive, personal, or confidential information, parts of it could potentially (though providers aim to prevent direct regurgitation) influence future outputs or be stored in ways you might not expect.
    • Data Breaches: Like any online service, AI providers can be targets for hackers. If they store your interaction history, a breach could expose your personal information or confidential data you shared.
    • Unintended Sharing: Without careful policies, your data could potentially be shared with third parties.
    • Understanding Policies: It’s not always clear from the start what data is collected, how it’s used, and how long it’s kept.

    Protecting your data is primarily about being aware of what you share and understanding the service you are using.

    Understanding How AI Tools Use Your Data (It Varies!)

    When you interact with an AI, your input (text, image, etc.) is sent to the AI model for processing. What happens next depends entirely on the specific AI provider’s policies:

    • Some providers use your input data (often de-identified or aggregated with others) to continue training and improving the general AI model.
    • Some store your data primarily to maintain your chat history or provide the service to you.
    • Many now offer options to opt out of having your data used for training.
    • Policies dictate how long your data is stored and under what security measures.

    Your actions, combined with the provider’s policies, determine your data’s fate.

    How to Protect Your Data: A Step-by-Step Guide

    Here are practical steps you can take every time you use an AI application.

    Step 1: Choose Reputable AI Providers (Do Your Homework)

    Not all AI tools prioritize privacy equally. Start by using services from companies with established reputations and clear data policies.

    • Look for Trustworthy Names: Companies that have been around and have a vested interest in user trust often have more robust privacy measures.
    • Be Cautious with Unknown Tools: If you’re dealing with sensitive information, think twice before using a brand-new or obscure AI tool without a clear privacy policy or track record.

    How to do it: Stick to well-known AI platforms initially. Before using a new service, do a quick search for reviews or discussions about its data practices (searching on forums like Reddit can be insightful, but verify information).

    Step 2: Read the Privacy Policy and Terms of Service (Know the Rules)

    This might seem tedious, but it’s the most direct way to understand how your data is handled by a specific provider.

    • Find the Policies: Look for links labeled “Privacy Policy” and “Terms of Service” or “Terms of Use” on the AI tool’s website (usually in the footer) or within the app’s settings or “About” section.
    • Scan for Key Sections: Look specifically for sections that talk about:
      • Data Usage: How they collect, use, and process your input data. Do they use it for training their general AI model?
      • Data Retention: How long do they store your input data or interaction history?
      • Sharing with Third Parties: Do they share your data, and under what circumstances?
      • Your Rights: Do you have the right to access or delete your data?

    How to do it: Before inputting anything sensitive, spend a few minutes reading the relevant sections of the policies. Use your browser’s search function (Ctrl+F or Cmd+F) to look for terms like “data usage,” “train,” “model,” “store,” “retain,” “share.”

    Step 3: Be Mindful of What You Input (Limit Sensitive Data)

    The most effective way to protect sensitive data is simply not to put it into the AI application in the first place, especially online ones.

    • Avoid Personal Identifiers: Do NOT include your full name, address, phone number, email address, date of birth, or financial information (credit card numbers, bank accounts).
    • Avoid Confidential Information: Do NOT input proprietary business secrets, confidential company documents, trade secrets, or any information protected by non-disclosure agreements.
    • Think Before You Type: Before you send a prompt, quickly review it for any information that is personal or confidential and isn’t necessary for the AI to complete the task.

    How to do it: Develop a habit of pausing for a second before submitting your input. Ask yourself: “Is there anything sensitive in here?” If yes, see if you can rephrase or remove that information.

    Step 4: Anonymize or Pseudonymize Data (Remove Identifying Details)

    If you need the AI to process information that contains sensitive details (like analyzing text about customers or events), try to remove or change the identifying parts first.

    • Replace Names: Change real names to placeholders (e.g., “Customer A,” “Employee X,” “Project Name”).
    • Remove Specific Dates/Locations: Generalize dates or locations if the exact detail isn’t needed for the AI’s task.
    • Strip Account Numbers or IDs: Remove any unique identifiers.

    How to do it: Manually edit text or data before copying and pasting it into the AI tool’s prompt box, replacing sensitive specifics with generic terms.

    Step 5: Use Privacy-Focused Settings or Opt-Out Options

    Many leading AI tools now offer built-in privacy controls you can adjust in your account settings.

    • Look for Data Usage Settings: Check your profile or settings menu for options related to “Data Usage,” “Training,” or “History.”
    • Opt-Out of Training: If available, toggle off settings that allow your input data or chat history to be used for training the general AI model.
    • Consider History Settings: Some tools allow you to turn off saving chat history. While this makes it harder for you to review past interactions, it might also reduce the data stored by the provider (check their policy for details).

    How to do it: Explore the settings menu of the AI applications you use regularly and configure the privacy options to your comfort level, especially opting out of training data usage if that’s a concern.

    Step 6: Secure Your AI Accounts

    Protecting the account you use to access AI tools adds a layer of security to your history and settings.

    • Use Strong Passphrases: Create unique, complex passwords for your AI accounts that you don’t reuse elsewhere.
    • Enable Two-Factor Authentication (2FA): If the AI service offers 2FA (like a code sent to your phone after entering your password), enable it. This significantly increases account security.

    How to do it: Go to your account settings for the AI service and update your password and 2FA options.

    Step 7: Be Aware of Data Retention

    Even if you opt-out of training, providers typically store data for a period for operational reasons (e.g., monitoring for abuse, improving service quality, legal requirements).

    • Understand that your input might be stored temporarily or for a specific duration based on the policy.
    • If you have extreme privacy concerns, consider that storing data, even temporarily, carries an inherent (albeit small) risk of breach.

    How to do it: Be aware of the data retention period mentioned in the privacy policy when deciding what level of sensitivity you are comfortable with inputting.

    Alternative for Highly Sensitive Data (Brief Mention)

    For tasks involving extremely sensitive, proprietary, or regulated data, using online general-purpose AI tools might not be appropriate, even with precautions. In such cases, some organizations explore private, self-hosted, or on-premise AI models where data never leaves their controlled environment. However, this requires significant technical expertise and resources and is not a practical solution for most individual users. The focus for typical users should remain on safely using reputable online tools.

    Putting It Into Practice

    Protecting your data while using AI apps isn’t about avoiding these tools; it’s about using them mindfully. Make checking privacy policies a habit, be conscious of the information you share in your prompts, use the privacy settings offered by the tools, and secure your accounts. By taking these steps, you significantly reduce the risks and can leverage the power of AI while better protecting your personal and confidential information.