Are you juggling numerous applications, browser tabs, and documents, leading to a cluttered and overwhelming screen? If your single desktop feels like a chaotic mess, then Windows 11’s multiple desktops feature is your productivity superpower. Also known as “Virtual Desktops” or “Task View,” this feature allows you to create separate, organized workspaces for different tasks or projects. Imagine having one desktop for work, another for personal Browse, and a third for creative projects, each with its own set of open applications.
I’ve found this feature indispensable for managing my workflow, especially when working on complex projects that require many open windows. It keeps my digital space clean and helps me focus without distractions. This guide will show you how to open multiple desktops in Windows 11, manage them efficiently, and boost your multitasking abilities.
What are Multiple Desktops in Windows 11?
Multiple desktops (or virtual desktops) in Windows 11 provide distinct, isolated workspaces. Each desktop can host different applications and windows, allowing you to logically group your tasks. For example, you can have:
- Desktop 1: Work-related applications (email, project management software, spreadsheets).
- Desktop 2: Personal Browse and social media.
- Desktop 3: Creative tools (photo editing, video editing software).
Switching between these desktops is quick and seamless, making it feel like you have several monitors even if you only have one physical screen.
Method 1: Using the Task View Button
The Task View button is the primary gateway to managing multiple desktops.
Step 1: Locate the Task View Button
The Task View button is an icon on your taskbar that looks like two overlapping rectangles. It’s usually located near the Start button.
- If you don’t see it, right-click on an empty space on your taskbar, select “Taskbar settings,” and then toggle “Task view” to On.
Step 2: Open Task View
Click the Task View button on your taskbar.
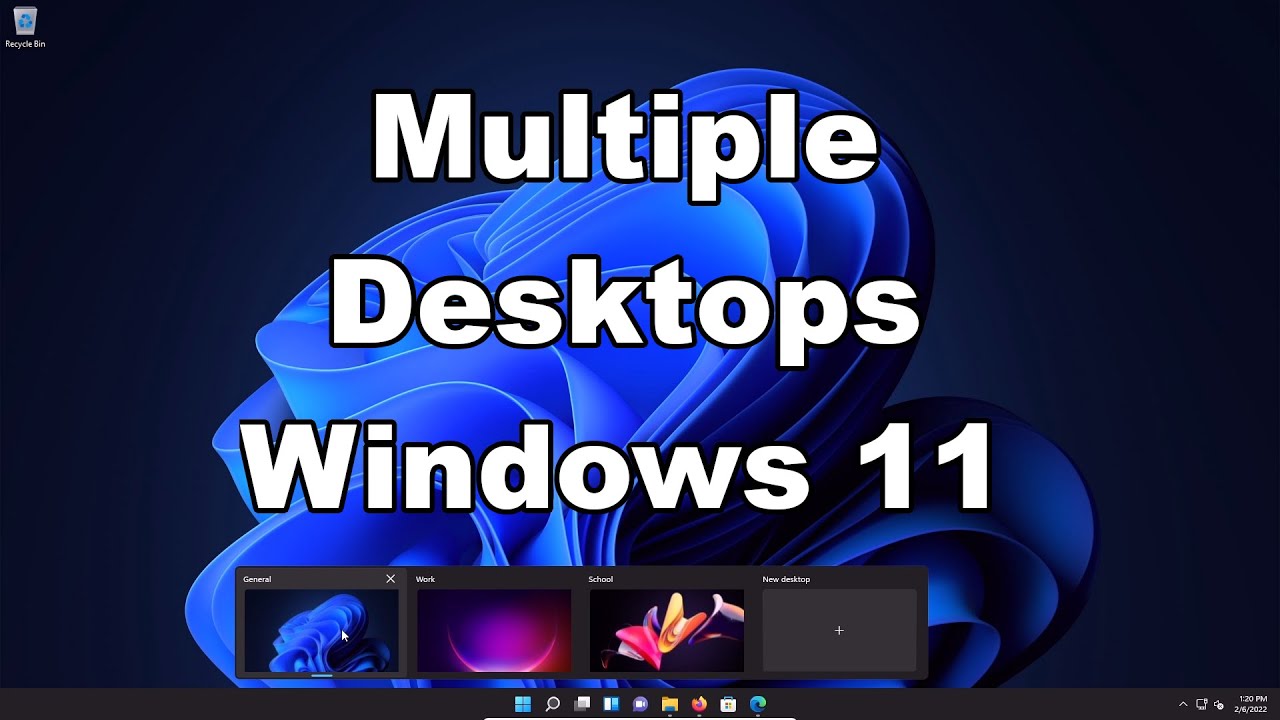
- This will open a full-screen interface showing all your open windows from the current desktop at the top, and a row of your existing desktops at the bottom. Your current desktop will be highlighted.
Step 3: Create a New Desktop
At the bottom right of the Task View interface, you’ll see a “+ New desktop” button (or a plus icon).
- Click this button to instantly create a new, empty desktop. A new thumbnail for “Desktop 2” (or the next sequential number) will appear.
Step 4: Switch to a New Desktop
Click on the thumbnail of the new desktop you just created to switch to it.
- Your screen will now be completely clear, providing a fresh workspace. You can open applications here, and they will only appear on this specific desktop.
Method 2: Using Keyboard Shortcuts (The Fastest Way)
Keyboard shortcuts are often the quickest and most efficient way to manage multiple desktops once you get used to them.
Step 1: Open Task View with a Shortcut
Press Windows key + Tab to open the Task View interface.
Step 2: Create a New Desktop with a Shortcut
Press Windows key + Ctrl + D.
- This instantly creates a new desktop and automatically switches you to it. You don’t even need to open the Task View interface first. This is my go-to method for quick desktop creation.
Step 3: Switch Between Desktops with Shortcuts
To navigate between your existing desktops:
- Press Windows key + Ctrl + Left arrow to move to the desktop on the left.
- Press Windows key + Ctrl + Right arrow to move to the desktop on the right.
Managing Your Multiple Desktops
Once you have several desktops open, you’ll want to manage them effectively.
- Rearrange Desktops:
In the Task View interface (Windows key + Tab), you can drag and drop desktop thumbnails to change their order. This helps if you want to keep related desktops next to each other.
- Rename Desktops:
Windows 11 allows you to name your desktops, making them much easier to identify and manage.
- Open Task View (Windows key + Tab).
- Click on the name “Desktop 1,” “Desktop 2,” etc., beneath the thumbnail of the desktop you want to rename.
- Type a new, descriptive name (e.g., “Work,” “Personal,” “Gaming,” “Project X”).
- Press Enter.
- Move Windows Between Desktops:
You can easily transfer open applications from one desktop to another.
- Open Task View (Windows key + Tab).
- Hover your mouse over the desktop that contains the window you want to move. This will show its open applications.
- Drag and drop the desired window’s thumbnail from its current desktop to the thumbnail of the target desktop.
- Alternatively, right-click on a window’s thumbnail in Task View, select “Move to,” and then choose the target desktop (e.g., “Desktop 1,” “New desktop”).
- Close a Desktop:
When you’re finished with a particular task, you can close its dedicated desktop.
- Open Task View (Windows key + Tab).
- Hover over the desktop you want to close.
- Click the “X” icon that appears in the top-right corner of the desktop thumbnail.
- Important: If there are open windows on the desktop you’re closing, they will automatically be moved to the adjacent desktop (usually the one to its left, or the next available desktop). No data will be lost.
- Close Task View:
Press Esc or click anywhere outside the Task View interface to return to your current desktop.
Advanced Tips for Multiple Desktop Usage
- Custom Backgrounds for Each Desktop: This is a fantastic way to visually distinguish your workspaces.
- Open Task View (Windows key + Tab).
- Right-click on the desktop thumbnail you want to customize.
- Select “Choose background.”
- This will take you to Personalization > Background settings, where you can select a different image for that specific desktop.
- Snap Layouts with Multiple Desktops: Combine the power of snap layouts within each virtual desktop. You can arrange multiple windows efficiently on one desktop and still have dedicated desktops for other tasks.
- Drag and Drop from Taskbar: You can even drag an application’s icon from the taskbar directly onto a desktop thumbnail in Task View to open it on that specific desktop.
Troubleshooting and Common Questions
- “My apps are showing on all desktops!”: This can happen if you set an application to show on all desktops.
- Open Task View (Windows key + Tab).
- Right-click the application window you want to manage.
- Ensure “Show this window on all desktops” is unchecked.
- If you want a specific app (like your email client) to be visible regardless of which desktop you’re on, then check “Show this window on all desktops” or “Show windows from this app on all desktops.”
- My Task View button is missing: As mentioned, right-click the taskbar, go to “Taskbar settings,” and ensure “Task view” is toggled on.
- What if I accidentally close a desktop? Don’t worry! Any applications open on that desktop will automatically move to the next available desktop. You won’t lose your work.
- Can I save my desktop layouts? Windows 11 doesn’t have a built-in feature to save and load specific desktop layouts or groups of applications. They persist across reboots, but for truly custom saving, you might need third-party tools.
By effectively utilizing multiple desktops in Windows 11, you can transform your multitasking game, reduce visual clutter, and improve your focus and productivity. It’s a simple yet powerful feature that, once mastered, becomes an essential part of an organized digital workspace. Give it a try, and see how much more efficient your daily computing can become!